Volkswagen Touran Owners Manual: Changing bulbs in the tail light cluster in the body
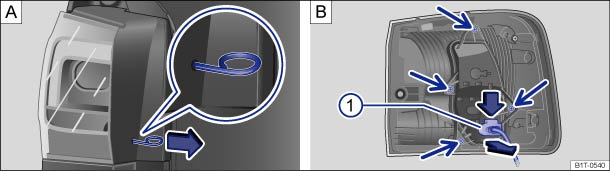
Fig. 222 A: removing the trim B: detaching the connector and removing the bulb holder
 First read and observe the introductory information
and safety warnings
First read and observe the introductory information
and safety warnings The actions should be carried out in the given order only.
Removing the tail light cluster
| The jobs should be carried out in the given order only: | |
|---|---|
| 1. | Observe and follow the instructions on the checklist . |
| 2. | Take the wire hook from the vehicle tools ( ) and insert it into the small aperture in the tail light cluster cover A. Turn the hook towards the centre of the vehicle and pull the cover out by approximately 1 cm in the direction of the arrow. |
| 3. | Pull the cover down first and then up and towards you. You can now see a screw behind the cover. |
| 4. | Use the flat blade of the screwdriver from the vehicle tool kit to remove the screw. |
| 5. | Push rear light cluster carefully towards the outside of the vehicle until it audibly disengages at the two latching points (ball heads). |
| 6. | Press the catch of the connector in the direction of the arrow. |
| 7. | Remove the connector B. |
| 8. | Carefully pull the tail light cluster to the rear to remove it from the body. Place it on a clean, smooth surface. |
Changing the bulb
| 9. | Use the screwdriver from the tool kit to unscrew the four securing bolts (arrows) . |
| 10. | Remove the bulb holder from the tail light cluster. |
| 11. | Replace the defective bulb with a new bulb of the same type. |
| 12. | Insert the bulb holder into the tail light cluster. |
| 13. | Use the screwdriver to screw in the four securing bolts. |
| 14. | Connect the connector to the bulb holder. The connector should audibly click into place. |
Fitting the tail light cluster
| 15. | Place rear light cluster in position against the car body and press it towards the middle of the vehicle until it audibly engages at the two latching points (ball heads). |
| 16. | Use one hand to hold the tail light cluster in the fitting position while using the other hand to screw the securing bolt firmly back in with the flat blade of the screwdriver from the tool kit . |
| 17. | First fit the tail cluster trim at the bottom and then fit it at the top in the original position. |
| 18. | Check that the tail light cluster is positioned correctly and securely. |
| 19. | Close the tailgate . |

Due to different versions of the tail light cluster, the location of the bulbs may differ slightly to that shown in the illustrations.
 Changing bulbs in the tail light cluster in the tailgate
Fig. 220 In the tailgate: removing the
cover
Fig. 221 In the tailgate: removing the
bulb holder
First read and observe the introductory information
and safety warnings The bulbs for the re ...
 Changing the bulb in the number plate light
Fig. 223 In the tailgate: number plate
light
Fig. 224 Number plate light: changing
the bulb
First read and observe the introductory information
and safety warnings
...
Other materials:
Volkswagen Touran Owners Manual. Driving in a way which will save fuel
Fig. 140 Fuel consumption in litres per
100 km at two different outside temperatures
First read and observe the introductory information
and safety warnings By adopting an economical driving style and anticipating
the traffic situation ahead, you can easily reduce fuel consumption by 10 to ...
Volkswagen Touran Service Manual. Technical Requirements
The wheel and tire combinations or retrofittings listed in
the individual vehicle tables refer exclusively to original disc
wheels.
Release of wheel/tire combinations or retrofittings with
disc wheels from the accessories trade is ...
